Thursday 29 August 2013

Ciao

We are back and we had the most wonderful two and a bit weeks away in Italy. I feel so lucky that we spent time with my folks in one of the most beautiful parts of the world and my heart yearns to go back and also to be with my parents again. Why is it that when you get older there is this great need to have time with your parents, am I alone on this? For me, I would love to have mum around the corner so we can natter over cups of tea and whilst creating and also for our kids to spend time with their grandparents, it is such a special relationship. Fortunately I did have these two very special weeks and Ma & Pa (I know you read this!) you are both very special and I love you!

 
I generally embrace the idea of coming home, there is something special about being in your own space and bed, but this time, I could have happily stayed in Italy forever, a girl can but dream. The first sight that greeted us were our newly painted doors and windows and yes it made me smile, it's finally done and I am so pleased with the end result. This was followed by a very overgrown garden that's in dying need of some loving hands. The pesky weeds have been having regular parties here in our absence, as to be expected, and it most certainly looks like they've been having far too much fun.


There is something special about walking through your front door when you get back and once I was inside, it felt good to be home and although I was faced with washing and unpacking and a zillion other jobs, there is always a little part of me that wants to hold on to that relaxed feeling that somehow only holidays can bring. The reality, it didn't last past a couple of minutes, but we are slowly getting back in the swing of things. I have made some progress with catching up on blog reading, with a little more to go, so sorry if I haven't gotten around to all of your lovely blogs as yet. It was my intention to do a little blog reading whilst away, but the internet connection was just a little temperamental and after the first couple of days, I decided to take a break from it all and it was the best decision. It was truly relaxing and there was a very big part of me that loved it more than I would like to admit to myself. It did bring up many questions about how much time we spend on and with technology every day, but I kinda like it and it has been great to catch up on what you have all been up to, you are such an inspiration to me.
 
I intend to do a couple of posts to cover the holiday, really as a record for us, but also for the rest of my family to share. In the meantime, I am going to make the very most of the last couple of days with my little lovelies as school starts the middle of next week and yes my baby is starting school, so big changes ahead, not sure I am really ready for them to be honest.


We have done a little baking and little Es helped me to work through the jungle to pull up some lovely looking garlic, carrots and beans. We also indulged in one of our apples, which are a great deal tastier than anticipated, I love this element of surprise.


One of the first things I love to do is to fill the house with flowers from the garden. There is something very special about having flowers in the house and I so love this beautiful red rose of ours, its fragrance is beyond heavenly and there is something so magical about Angel's Blush, I love the way these beautiful clumps are shaped out of delicate white flowers. I fortunately managed to get a small posy of sweet peas for the house, but the next step is to get all the seeds for next year's planting.

The first photo was taken shortly after we arrived in  Fauglia, Tuscany and was taken from the car. I absolutely love Sunflowers and have failed miserably this year with the ones we have planted, but even though the sunflower season was drawing to an end in Italy, we were fortunate enough to find this one field with perfect sunflowers dancing to sun, such a delight.
 
 
I will be back soon with a some goodies from our trip, and also to share the crafty bits that made the holiday even more enjoyable. A very big and warm welcome to my new followers, it is so lovely of you to stop by and I look forward to getting to know you a little better.
 

Wishing you all a very happy Thursday.
Warm wishes
Hannapat
xoxo


Friday 9 August 2013

What's in my bag

It's official the excitement has finally grabbed hold of me and is fuelling my veins. In less than 24 hours we will hopefully be landing in Pisa, where we will be spending some time before heading to Rome for a long weekend, whoohoo!!! To top this my lovely parents will be joining us and we will see them for the first time in a year, so needless to say I am one very excited bunny right now!


A year ago I was a little apprehensive about going anywhere away from home as I hadn't really stepped outside our four walls for a few years and the prospect of going to town let alone holiday, was most certainly pretty overwhelming for me. Now, because we have done it, I am feeling a great deal more confident about the whole affair and know that we can manage with my wheels and the kids. I am still aware of the restrictions that my wheels might bring, but at least I can get around and live a little, so I am not going to grumble! It is most certainly going to be an interesting holiday as not only will I be in my wheelchair, but Mum, who is currently unable to walk, due to a very bad back in dying need of an operation, will be joining me with her own set of wheels. The thought of this has conjured up many interesting thoughts, especially knowing what my Dad is like. He is still in child in so many ways and always up for having a little fun and oh so very good at planning and scheming in order to have a laugh, I love his passion for life! This time I reckon Ma and me are in for some fun and games, just think, two men and the other (better halves I hasten to add :-)), who will be holding the reins so to speak. Now that's a thought, and I am sure there will be a fair bit of scheming and pardon the pun, wheeling and dealing going on. The prospect of a couple of hours without the wives will most certainly be appealing, but fortunately we have our safety net, the kids, which might just sway matters a little, not that that will stop the temptation to see who can make it down the Spanish steps the quickest. I think it is fair to say that if nothing else, we will most certainly be providing some comedy value for those around us. Watch out Spanish steps here we come!!


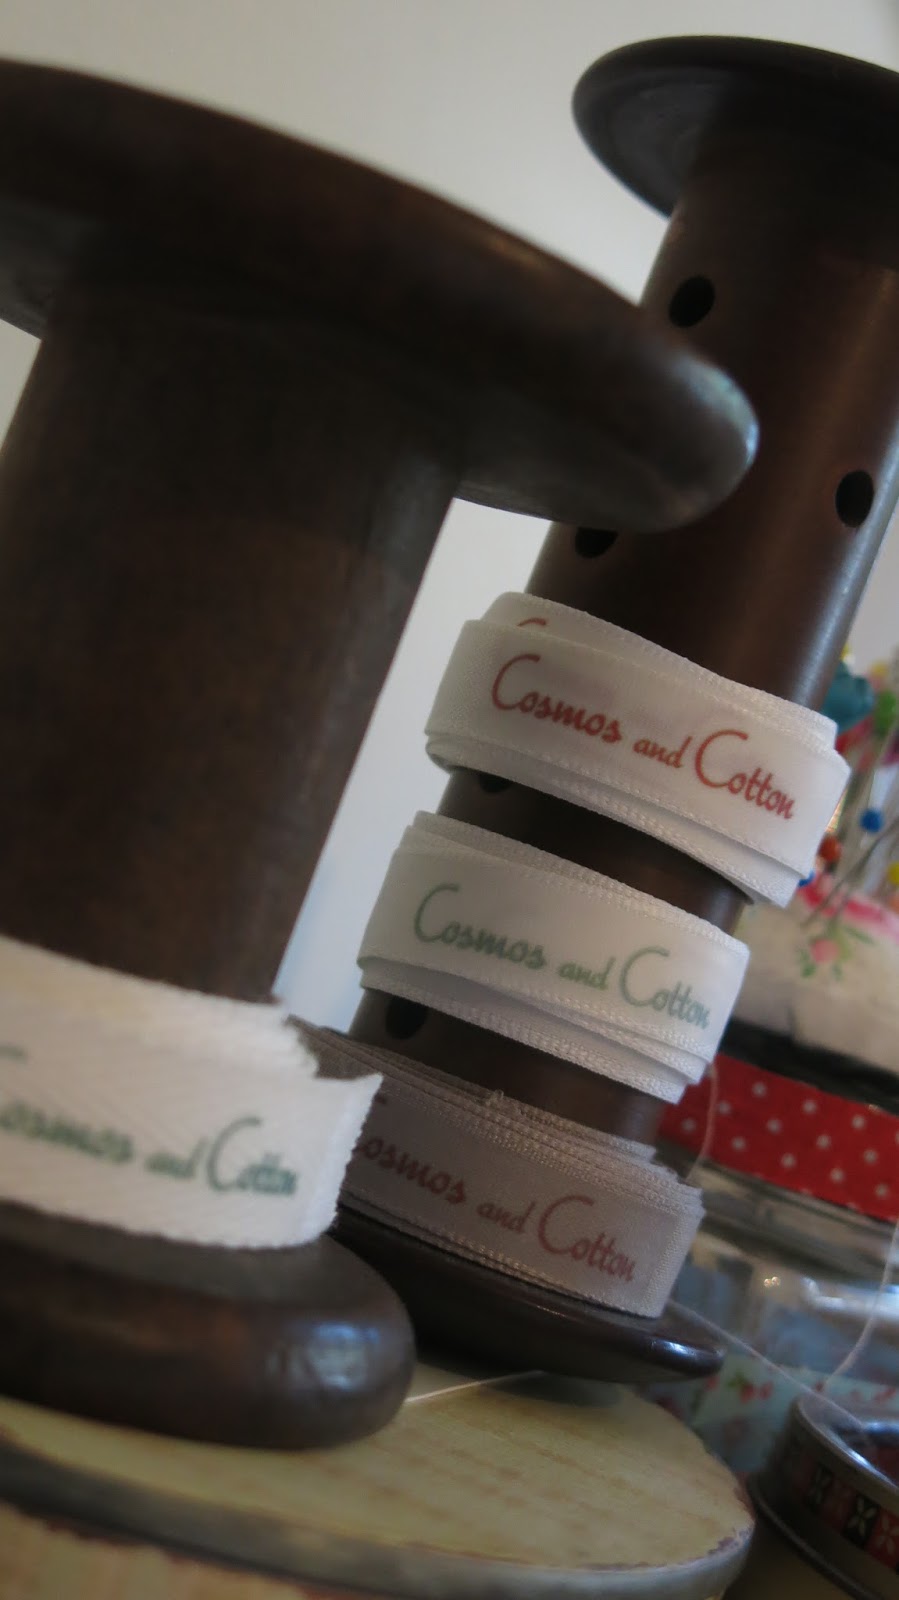
The last week has been a bit of a mad rush as I am sure many of you can relate to before going away. What is with getting everything done before going away? Is it just me or are you like that to? I wanted to tick a few things off my list that I have been meaning to do for quite some time, like this label tutorial that I wanted to do a few months back now, amongst many other things. I feel satisfied that I managed to get a large majority, but not all, done and I feel like I can now finally start to relax.


Books are always the first things I try and pack and the staples include the necessary tour guides and road maps, quite a lot of books for the kids, which aren't in the picture, but there are a couple of longer stories to read to them and I don't think you can ever go wrong with Enid Blyton and Roald Dahl. My kindle, with its little case that I blogged about here, is ready for some action with The Night Circus by Erin Morgenstern and one of the very few books by Jojo Moyes that I haven't read, Silver Bay. Reading more than usual is the one thing I really enjoy about going on holiday.


So what does a gal put in her bag. Well for me, this is always an interesting one, maybe becos I am just plain nosey. Maybe it all stems from years in boarding school and loving Sunday nights when everyone came back after a weekend at home with new bits from home. Anyways, I love it, so I thought I would give you a little peek at a few of the bits that's gone in my bag. As for clothes, well these days with kids in tow, space is limited, especially with a wheelchair and two kids to manage, so we try and pack as little as possible. It didn't however stop me from having fun deciding what to pack. Maybe I am a little sad, but I quite enjoy this part of the packing. Do you get excited about the selection process?


This yellow cardigan is just the most loveliest of knitted cardies that my granny knitted many years ago and wore for so many years that I have countless memories of seeing her in this. Fortunately my parents passed this on to me when she passed a few years back and now I can shape some new memories with it as I just love wearing it.


Now for cosmetics, I quite like knowing what people use, so I thought I would share my little goodies with you. For my skin, I use Environ and swear by it. Even though it is a little pricey, it does last quite a long time and I honestly haven't come across anything as good as this. Their RAD sun cream is also especially good to use on a daily basis, something I really try and do as my skin got quite damaged being exposed to the sun whilst living in South Africa for so many years. Now for foundation, I love this stuff!! It has no nasties and it lasts soo long. Honestly I buy a maximum of two pots a year, if that, and they now also do a really fab mascara that I love! The foundation is a mineral based powder foundation and I love that it lasts all day and acts as a barrier to the sun. As for suncream, we always use Green People's scent free SPF25 during the summer. Largely because it doesn't burn your eyes, which I must say is a blessing with the kids and it's brilliant if you're planning on spending time in the water.  Then some L'Occitane Shea Butter hand cream that was a rather lovely pressie and I can't wait to start using it.


Now for the exciting bit, what's going in my yarn bag. To be honest I struggled with this as there are so many little projects that I would like to take with, but I know that with Ma and Pa there I am going to want to natter and spend time with them. I am however going to make the most of having Mum at hand and rope her in for some embroidery lessons whilst we are together to hopefully get a few tips from the Master herself! Do you also struggle deciding what projects to take on holiday with you?


Before I go I wanted to leave you with this quick and easy to make lavender wreath. After being inspired by a friend and all the lavender around, I grabbed some wire, pliers, lavender and some rosemary and got started.


I am going to use these couple of weeks wisely and abstain from blogging (it that's possible!). I will try and read posts if and where possible. I have however recently joined Instagram, and must say that I LOVE it! If any of you want to pop over to see what's happening on our travels, my user name is cosmosandcotton.

Before I go, if you haven't already seen The Untouchables then, please treat yourself and watch this wonderful French film. I have a bit of a passion for French films and this one is another wonderful film to add to my list of favourites. It's funny, inspirational and so very moving. Leaving you with the little posy from our garden, my Hydrangeas are finally in bloom.


Thank you for all your lovely comments over the last couple of posts, I love reading each and every one of them. You are all super special and make this blogging malarkey so much fun! Wishing you all a very lovely couple of weeks with lots of crafty happiness.

Warm wishes
Hannapat
xoxox


Wednesday 7 August 2013

How to make your own fabric labels

A few months ago I was determined to find a way of doing my own labels, but found it quite difficult to find any tutorial on this. The thing that I found the hardest was dealing with the printer and that might very well just be me and my lack of technical knowledge. I always thought I was pretty savvy on a computer back in the day when I had a proper job, but these days I find myself constantly singing the lyrics 'my computer think I am gay grey', and soon I might also feel like throwing this 'piece of junk away' from Placebo's new song 'Too many friends' .  No disrespect here to any older bloggers and readers, but whenever I am faced with technical difficulties, i.e. struggles with my computer, I always feel like I should be well over a hundred. It's that thing where your kids, aged 6 and 4 starts knowing more than you and boy does that make you feel old or what?? Anyways, it took me a couple of attempts to figure out how to print these labels, so I figured a little tutorial might be helpful to a few folk out there interested in making their own fabric labels.


So here goes.

What you are going to need.

1. A pack of transfer paper, which I bought here.
2. Some ribbon and or tape of your choice
3. Computer
4. Inkjet printer and not Lazerjet
5. Iron and ironing board or mat
6. Cup of tea and some chocolate (in my case Lindt 70%)


Step 1
Design your label on either word, excel or whatever programme you wish to use. I just wanted something simple, so I used word, but you can add an image or tweak this to whatever you want.


Step 2
Once you are happy with the colour, font and everything else, it's time to print it. Make sure you do a test run on normal paper and not transfer paper as it's pretty expensive stuff. Select print and then click on 'Printer Properties'


Once you have done this you will see there is something along the lines of 'Basic, Advanced and Support' as options, select 'Advanced.

 
Once you have chosen 'Advanced' then you should see 'Mirror Printing' or something similar as an option. Select 'Mirror Printing'.


You are almost there now, all you need to do now is have a sip of tea and press the 'Print' button and voila. Remember to try your first one on normal paper just to check that the mirror image printing has worked.


This is what you should have in front of you now. Once you are happy with everything, repeat the process again, but this time using the transfer paper.
 
 
Step 3
Now you need to cut your labels so that you can lay them on to your chosen ribbon or tape. Once you have cut the labels, I put mine all in a bowl so they are to hand and easy to grab, you can lay one or two labels at a time on to your ribbon and then put your iron on it for a good 30 seconds if not a little more. It will be easy to see when the glue has taken as the label will be completely attached to the ribbon or tape. I spaced mine out so there is enough space in between, baring in mind that you want to cut it and sew it in/on to the desired product.


Step 4
It's important to give it some time to dry before you start peeling off the back of the labels. This is the exciting bit to see how it all turned out. Slowly remove the back of each label and hey presto you should have all your labels on a ribbon or tape, ready for you to cut up and use.


Step 5
Lastly I just rolled all my labels on to some old cotton reels, ready to be used. I have used these on many different things that I have made and they look lovely.


Step 6
Make another cup of tea and feel chuffed that you have managed to make your own labels.
 
 
I hope you have found the tutorial easy to follow, please give me some feedback as I am new to this whole tutorial malarkey and would welcome any feedback.
 
Wishing you all a very happy day.
 
Warm wishes
Hannapat
xoxo


Tuesday 6 August 2013

Baking with the kids

Holidays always call for lazy mornings and baking with the kids.


Gingerbread men, their very favourite. Now that little J can read they managed to do it all on their own with a little supervision here and there. It was such fun to watch them work as a team, it most certainly warmed my heart!


Here is the recipe that we always use. I love trying new recipe's so hope you have fun making these.

Ingredients

175 plain flour
1/4 tsp bicarbonate of soda
pinch of salt
1 rounded tsp of ground ginger
t tsp of ground cinnamon
a large pinch of ground allspice
75g unsalted butter, cold and diced
75g caster sugar
2tbsp golden syrup
1 large egg yolk

Method

1. Sift the flour, bicarbonate of soda, salt, ginger, cinnamon and allspice into a bowl.
2. Rub the butter into the dry ingredients until the mixture resembles breadcrumbs.
3. Add the sugar and mix.
4. Beat the golden syrup and egg yolk together and add the bowl and knead it very lightly.
5. Flatten and put in the fridge for 30 mins.
6. Preheat the oven at 180C (350F)
7. On a lightly floured surface roll out your dough to around the thickness of 4mm and start stamping away with your cutters.
8. Put it on baking trays and pop in the over for 10 minutes
9. Have fun decorating and eating them


The lovely little E, always so keen to do a spot of baking and she is so very good at it. She made these banana muffins all on her own, I was very proud!! These are super easy muffins to make and I love recipes that give you the opportunity to use up things in the house that has gone a little past its best.

We use this recipe all the time, but instead of using butterscotch, I sometimes (not always) add a little white chocolate for a treat.

Hope you enjoy a little baking where you are. I always find it rather therapeutic, especially when the kids have magicked  a cloud of flour dust, oh the joys!!

Warm wishes
Hannapat
xoxo

Crochet potholder and sweet memories

Today I just quickly wanted to share a couple of things that has put a smile on my dial over the last couple of weeks. I personally love logging these little memories as I know in years to come I can smile again as I look back on them.


Some rather lovely parcels all the way from Australia. The first was my little prize I won in Mezz's lovely giveaway. They are two super cute magnets that she made herself and they look great on our fridge, so thank you Mezz! The second parcel really warmed my heart and was from the very lovely Leisa at Vintage Bird Girl, whom I have grown rather fond off over the last couple of months. She is such a darling and sent me this lovely thank you card and this very gorgeous hankie. It couldn't have come to a better home as I love hankies and use them every day.


A pic of little Es on her last day at preschool, and the only one where she isn't picking her nose (:-)). A shame I can't show the one of J as he has too many other kids around him.


Now on to some crochet. I saw this rather lovely looking mandala pattern in this month's Simply Crochet magazine and I just had to make it. It was a fun little project to work whilst getting hooked on the BBC's series Silent Witness. They have just finished showing the 16th series, yes I know we are centuries behind the rest of the world, but that's pretty normal for us. This now means that we have some serious catching up to do with 15 series' to get through, so I can see a request for a couple of these box sets going on a Christmas list this year. Are any of you watching this and have you been following it all the way? What do you make of the earlier series'? What other series are you in to? It's always good to get some suggestions on what to watch.
 
For this project I used Paris Drops Cotton and once I got in the swing of things it was pretty straight forward and it looks rather lovely on our island in the kitchen. The first picture is before blocking it and the second after. It makes such a difference. Something I am still to do for this potholder below.


I have been wanting to make this potholder for so long as I have been crocheting, so for around two years, time flies when you're having fun! You can find the pattern on Ravelry for free and I used Aunt Lydia's No.3 Crochet Cotton in Scarlet, Pine Green and Natural, all bought from Rainbow Silks. I played around with the colour for the back as the pattern is for a plain natural back and I quite like a little red mixed in. I really enjoyed working with this crochet cotton it was much softer than some of the other mercerised crochet cottons that I have worked with in the past. It won't be long before I purchase a little more of this as I am already planning the next potholder project.


I found this lovely macrame plant hanger in the charity shop for £1. I love these and always try and buy them when I can get my hands on them. They always remind me of my childhood and I wouldn't mind giving it a go one day. Have any of you had a go at making one of these? In the meantime I have also been inspired by Dottie Angel's 'peachy-plant-pocket-handy-hangers', which is such a spiffy take on it.
  
  
Hope you are all keeping well wherever you are. This week feels like it's on fast forward. I have a few more posts coming your way, so will be back soon.
 
Warm wishes
Hannapat
xoxo