
So here goes.
What you are going to need.
1. A pack of transfer paper, which I bought here.
2. Some ribbon and or tape of your choice
3. Computer
4. Inkjet printer and not Lazerjet
5. Iron and ironing board or mat
6. Cup of tea and some chocolate (in my case Lindt 70%)
Step 1
Design your label on either word, excel or whatever programme you wish to use. I just wanted something simple, so I used word, but you can add an image or tweak this to whatever you want.

Step 2
Once you are happy with the colour, font and everything else, it's time to print it. Make sure you do a test run on normal paper and not transfer paper as it's pretty expensive stuff. Select print and then click on 'Printer Properties'
Once you have done this you will see there is something along the lines of 'Basic, Advanced and Support' as options, select 'Advanced.

Once you have chosen 'Advanced' then you should see 'Mirror Printing' or something similar as an option. Select 'Mirror Printing'.

You are almost there now, all you need to do now is have a sip of tea and press the 'Print' button and voila. Remember to try your first one on normal paper just to check that the mirror image printing has worked.

This is what you should have in front of you now. Once you are happy with everything, repeat the process again, but this time using the transfer paper.

Now you need to cut your labels so that you can lay them on to your chosen ribbon or tape. Once you have cut the labels, I put mine all in a bowl so they are to hand and easy to grab, you can lay one or two labels at a time on to your ribbon and then put your iron on it for a good 30 seconds if not a little more. It will be easy to see when the glue has taken as the label will be completely attached to the ribbon or tape. I spaced mine out so there is enough space in between, baring in mind that you want to cut it and sew it in/on to the desired product.


Step 4
It's important to give it some time to dry before you start peeling off the back of the labels. This is the exciting bit to see how it all turned out. Slowly remove the back of each label and hey presto you should have all your labels on a ribbon or tape, ready for you to cut up and use.


Step 5
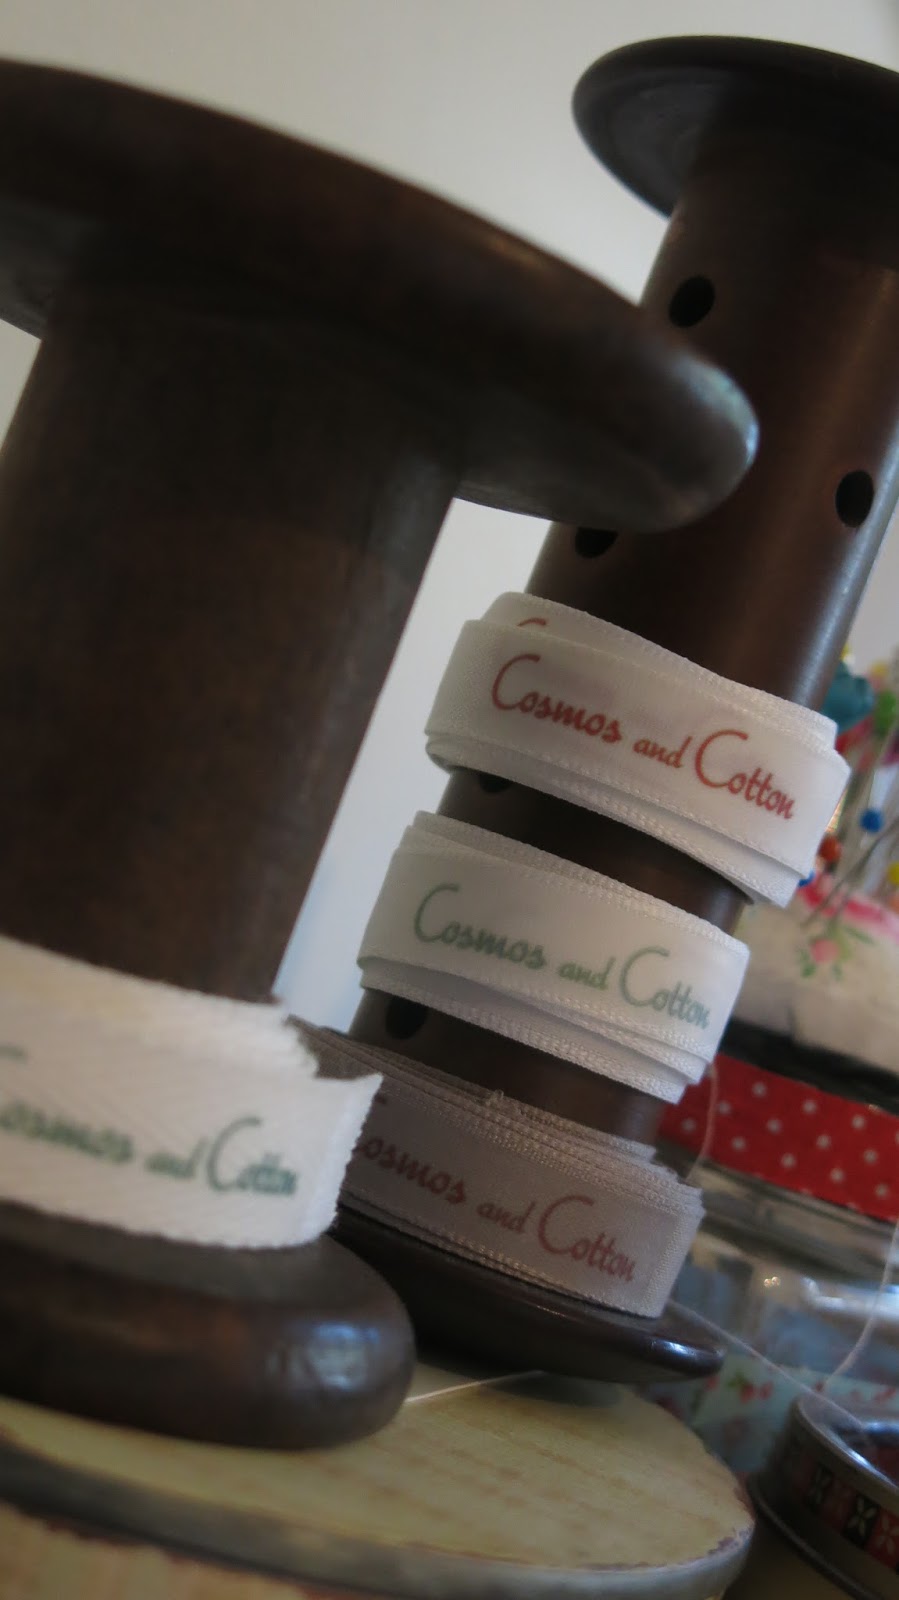
Lastly I just rolled all my labels on to some old cotton reels, ready to be used. I have used these on many different things that I have made and they look lovely.


Step 6
Make another cup of tea and feel chuffed that you have managed to make your own labels.
I hope you have found the tutorial easy to follow, please give me some feedback as I am new to this whole tutorial malarkey and would welcome any feedback.
Wishing you all a very happy day.
Warm wishes
Hannapat
xoxo
Wonderful tutorial, Hannapat! Nice and clear and easy to follow....and I like the cup of tea and chocolate tip too!
ReplyDeleteWishing you a lovely week.
Helen x
Thanks Helen, a girl needs her chocolate fix especially when faced with these technical challenges. xo
DeleteNicely done m'dear, and very helpful :)
ReplyDeleteThanks Annie xo
DeleteYou've described and shown this so well Hannapat - congratulations - another step forward in your technological side of life! And your labels are so pretty - they'll make all your goodies look just that bit more professional! Well done!
ReplyDeleteJoy xo
Thanks Joy, thanks for the feedback xo
DeleteHannapat how clever you are and what a useful tutorial, thank you so much. I always buy my labels but would rather make my own as you have. Will certainly be trying this one out Hannapat. I love your blog as it is so diverse and interesting. Have a wonderful day tomorrow
ReplyDeleteLots of love
Dorothy
:)xxxxxxx
Thanks Dorothy, I wouldn't go as far as clever, but I got there in the end. Hope you enjoy making them! xo
DeleteHannapat, you amaze me! They are wonderful, I would never of thought of it! :) x
ReplyDeleteThanks Ada, so do you my dear! xo
DeleteThese are really fantastic! You are very clever! Thank you for such a lovely clear tutorial. I need all the help I can get with computer stuff really and at work now we are expected to do so much more on the computer and online (I am a nurse). I am definitely no whizz and I am very impressed by what you have done here!
ReplyDeleteWishing you a very happy weekend!
Marianne x
Thanks Marianne, I am pleased that you found it clear. I hope you have fun trying it. I know exactly what you mean as it has all now become so admin focussed and the demands have most definitely shifted. It must be a very rewarding job though xoxo
DeleteHey hey, I'm gonna look like a real pro now! Thank you soooooo much for the inspiration and the fab tutorial - I'm going to make some of my own and look like a proper crafty person! The font you used is simply divine, and the result is a gorgeous ribbon label, well done! Gifts will be even more beautifully personal... Cx
ReplyDeleteHey hey, I wish, but thanks anyway. xoxo
DeleteYou really are such a clever girl! The tutorial is so clear that even I can understand it. ( You know one of those people that not only feels older than 100 but is almost there) Only problem - my printer is a lazer. But I will make a plan. Borrow a printer. Love you!
ReplyDeleteYou are over a 100, aren't you?? Hee hee!! xoxo
DeleteI've often wondered how to do this and I am definitely going to try it, had to ask my hubby if our printer was an inkjet or not! Thanks so much and I just love your blog.
ReplyDeleteTerri X
I am def going to give this a go - thank you. My printer has always got it in for me so it should be fun! It knows I have no clue as to what I am trying to do. Just stumbled across your blog and love it. Sue x
ReplyDelete